Daily Inspiration -
Your thoughts create your reality. If you’re worried about the future, that’s what you’re creating. If you think thoughts about positive outcomes, that’s what you’re creating. Source energy does not know if what you’re thinking is real or imagined – it simply matches your vibration.

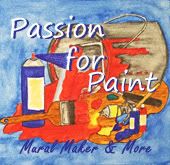
Sure, you can use a photo editing program to make your own blog button, but why not paint one? Even if you can’t draw, you can download some clip art and go from there.
I have been thinking about hosting a linky party for a while – a Passion for Paint party. It’s for all things painted – spray paint, crackle paint, furniture, artwork . . . you name it! Once I decided to commit to it, I had to choose a time that would fit in my crazy schedule.
Passion for Paint party
* Sundays *
beginning August 29th
Next I wanted to paint my own button. Yeah, I could’ve just done some text and a background, but it’s a PAINT party! The button should be painted! 
I started with watercolor paper and a pencil sketch. It might be a little hard to make out but there’s a can of paint, a roller, paint brushes, spray paint, artist palette & craft paint. Did I leave anything out?

I went over the pencil sketch with Sharpies so I could see it better. I know – there’s a ton of detail for a little ol’ button, but that’s the way I do things.
Then I grabbed my watercolor pencils.

If you haven’t tried these, get some when you can. There are endless possibilities for using these. If you scrapbook, you’ll really love them.

I colored in the background first.

Then, just take a damp paintbrush and smooth out the pencil strokes. It turns into watercolor paint. Awesome! And since it’s watercolor, you can move it around without it drying too fast.

I did the paint can in black & grey, then the artist palette in brown.

Tons of red! Too much? Oh well, too late now!

Tightened things up a bit with my Sharpies (and a little contrast from Photoshop) and all that’s left is to add some text.

I can’t enlarge the button without distortion. This one is 165 x 165 pixels.
Now, how to make it a linky button? I did it once, for the 4th of July. But who can remember back that far?
I loaded the button into Photobucket – the hosting choice for most bloggers. Then came the tricky part (if you’re not great at html, which I am definitely not). How to get the little box underneath that shows the html code so people can link up to the party.
After some searching, I found MusingsofaHousewife. She makes it really, really simple. There are loads of other instructions out there, but hers worked for me.
Now all I have to do is head over to Mr. Linky and set up the date. I like Linkytools rather than InLinkz. For some reason I always have problems posting my thumbnail with InLinkz. And I want to see everyone’s paint projects!
I hope you’ll visit Sunday, August 29th! If you know anyone who’s painted something, send ‘em on over!
I’m linking (of course) up to these parties today.


Colleen
Ahh! I think this is a lovely idea!! I LOVE to paint so this would be a great way to start featuring my paintings too. Ive been wanting to post more of my paintings.. but havent gotten around to it.. so now I must! :)
ReplyDeleteYoure button turned out so good. :) What a fun twist on the norm!
what a great idea and I love the button!!!! I better get to blogging, as I have so many things to share!!!
ReplyDeleteAdorable button and I am in! Great idea!
ReplyDelete