
Hello! Welcome to Day 1 of 31 Days of Easy Holiday Paint Projects! It is 8:30 p.m. and I am just now writing my post for tomorrow – the first of 31 consecutive posts.
Something tells me this is gonna be a little more challenging than I thought.

But it is a ‘challenge’, and I’m not the only one in it. I’m joining a great group of bloggers over at The Nester. I hope you take a few minutes to check out some of their 31 Day posts too.
Now, even though I’m a little late in posting tonight, I do have a 31 day calendar of paint projects scheduled outlined penciled in. Here’s the way it’ll work – each day there will be a paint tutorial. Some will be quick, some not-so-quick. Some tutorials will be a part of a larger tutorial that will follow.
Like the Bat & Harvest Moon today. This tutorial and the tutorials for the next few days will all come together for a tea light lampshade -
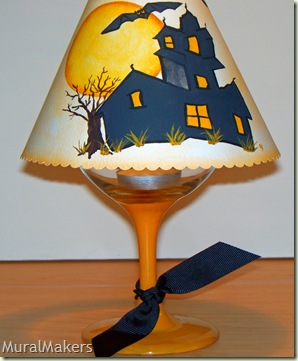
Like this one. We’ll paint a ‘shade’ on watercolor paper, drop a tea light in a wine goblet, and you’ll have a festive light for Halloween!
Right now I’m thinkin’ it’s quite fitting that Day 1 is a bat and harvest moon because I’m sure I’ll be a l’il batty by the time this challenge is over.
(a l’il more batty than usual, that is.)

Ok. Let’s get started. Here’s the supply list for painting the bat and harvest moon:
- water basin
- paper towel
- ‘palette’ (foam plate)
- watercolor paper (or anything else you want to paint on)
- transfer paper & stylus (or pencil rubbed on the backside of pattern)
- paint brushes (I used #8 flat and #2 liner – use what you have for this tute.)
Paints (all by Plaid)
- Licorice (black)
- Medium Grey
- Antique Gold
- Turner’s Yellow (deep yellow)
- Raw Sienna (caramel brown)
- Folk Art Floating Medium*
*I use Floating Medium a lot in my painting tutorials. While it’s not a necessity, it’ll make your life a whole lot easier and painting a whole lot more fun. You can get it in any craft store that carries Plaid paints (Michael’s, HobLob) and some Walmarts.

Step 1 – Draw a circle on to watercolor paper.
Just find something round and trace it. The circle I used is about 5 or 6 inches in diameter.

Step 2 – Basecoat ‘moon’ with Turner’s Yellow.

Step 3 – ‘Load’ brush with floating medium then pick up Antique Gold.
The floating medium makes the paint flow easier, remain wet longer, and gives it translucency. Translucency aids in blending colors.
You can also try ‘painting’ the edge with just Floating Medium first, then applying Antique Gold over the Medium. That works too.
If you don’t have Floating Medium you can ‘wet-blend’ by applying Turner’s Yellow and adding Antique Gold next to it, then blending the two together where they meet.
It works just as good, but it might take a little more practice.

It’s very common to have a) ridges and b) obvious mark where you put your paintbrush on the paper.
For ridges, take a clean brush and smooth them out.
For marks, wipe the brush back and forth to blend the mark into the painting.

Here’s a pic of the moon with Antique Gold painted over the Turner’s Yellow on the edge.

If you have an obvious line between the two paint colors, take some Floating medium and smooth over the line.

Let the Antique Gold dry fully and then add shading with Raw Sienna, this time loading paint on only one-half of the brush.

Don’t worry about little overpainting areas, aka boo-boo’s.

Next, we’re gonna paint on the outside of the moon with a mixture of medium gray and Licorice. If you have a dark gray, just use that. I didn’t have one on hand, so I just mixed these two colors.

Remember the ridges I mentioned earlier? Yeah, well, they tend to show up when you’re basecoating – like the gray + black background. To avoid them, place your brush about 1/8 of an inch away from the moon, stroke the paint, and then move it closer to the moon.
Right about now you might be thinking wouldn’t it just be easier if she’d shoot a video?
Yes, it would. I’m working on it.
Truth be told, I’m a little panicky about videos. But that’s a whole nuther post. I’m working on it.

Ok, so I just painted a gray + black circle around the yellow + gold + raw sienna circle because I was lazy I thought it’d be cute to cut it out.

Now transfer the bat silhouette – part on the moon and part on the background.

Paint the bat black. Now do you see why I wanted the background with some gray in it? Mine could’ve used a little more gray so the bat showed up better.

When it dried, I just cut out a circle, leaving a little bit of the bat wing hanging out.
Hey, I just realized it looks like an old 45. You know – the record? Ok. I guess you gotta be over 45 to know what a 45 is.
If I still had any, I’d just add the moon and bat to it and save myself a couple of steps.
Or sell them on ebay. After Halloween.
So what can you do with a little bat on a harvest moon?

Maybe stick it on a mirror with some Dollar Store spiderweb?

And maybe put a candle underneath it so looks like it actually glows?
I don’t know yet. It’s now 9:30 p.m. and I’m a half hour late for my nightly date with computer games. I’ll find a place for the bat & moon tomorrow morning. . .
after I link up to Nester’s 31 Day Link Party.
I hope to see you for Day 2 when we’ll paint a haunted house! mmwwha-ha-ha. In the meantime, check out another 31 Day-er!

Sharing this project at these lovely parties!

No comments:
Post a Comment